Spielanleitung
From 1100ad
wallisgirl (Talk | contribs) |
|||
| Line 1: | Line 1: | ||
| + | {{Header|Menu=[[Hauptseite]]}} | ||
| + | |||
'''Bisher existiert nur die englische Version. Wird demnächst übersetzt.''' | '''Bisher existiert nur die englische Version. Wird demnächst übersetzt.''' | ||
Revision as of 12:58, 21 May 2013
| Hauptseite | Last Edited: 21.5.2013 by wallisgirl |
Bisher existiert nur die englische Version. Wird demnächst übersetzt.
Contents
|
Die Grundlagen
Wir empfehlen zuerst die Information über den Spielhintergrund zu lesen. Weitere Informationen finden Sie auf der Hauptseite und im Inhaltsverzeichnis.
Stadt
Wenn Sie mit dem Spiel beginnen, werden Sie mit Hilfe eines Tutorials durch die wichtigsten Etappen des Spiels geführt.
Das wird Ihnen helfen, die Grundlagen des Spiels zu verstehen und was noch wichtiger ist, Ihre Stadt schneller zu entwickeln. Wenn Sie dem Tutorial folgen, erhalten Sie nach jedem erfolgreichen Schritt eine Belohnung.
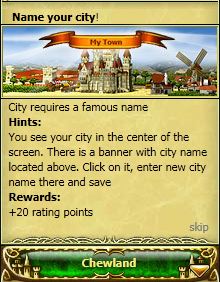
Stadt umbenennen
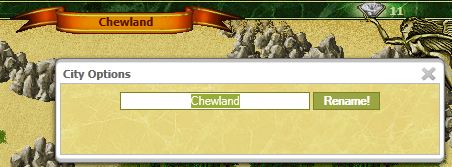
Den vom System definierten Stadtnamen müssen Sie nicht behalten, wenn er Ihnen nicht gefällt. Sie können die Stadt einfach umbenennen. Um dies zu tun. klicken Sie auf das orange Banner mit dem Stadtnamen (oben in der Mitte der Stadtansicht). Es öffnet sich ein neues Fenster und Sie können Ihre Stadt umbenennen.
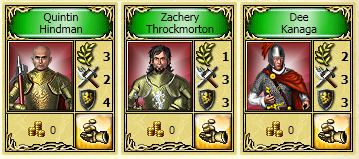
Held anheuern
Ihr erster Held ist frei und kann im Schloss angeheuert werden. Sie können dabei zwischen 3 Helden auswählen.
Falls Sie später feststellen, dass Sie den falschen Helden ausgewählt haben, können Sie in die taktische Ansicht gehen und den Helden töten. Dann können Sie einen anderen freien Helden auswählen.
Der getötete Held kann innerhalb von 7 Tagen wiederbelebt werden. Danach verschwindet er für immer.
Um einen Helden zu töten:
In der taktischen Ansicht: 1) Trennen Sie den Helden von seiner Armee ab → 2) Selektieren Sie den Helden → 3) Klicken Sie auf "Fortgeschrittene Aktionen" → 4) Klicken Sie auf "Ausgewählte Armeen auflösen (killen) selected armies".
Bevor Sie Ihren ersten Helden auswählen, sollten Sie die Abschnitte über die Helden lesen.
Beginn der Rohstoffproduktion
Es gibt 9 Arten von Rohstoffen im Spiel. Die meisten werden von Gebäuden in Ihren Städten produziert, einige können Sie im Austausch gegen echtes Geld erhalten.
Diese sind:
- Kohle — Kohlenmine ;
- Eisen — Eisenmine;
- Stein — Steinbruch;
- Holz — Sägemühle;
- Kalk — Kalkofen;
- Bevölkerung — Bauernhöfe und Brunnen;
- Söldnerpunkte — erhält durch den Bau von Obelisk, Ruhmesbrunnen, Söldnerlager oder Vertragsbestandteil (Ordensmitglied, Vasalle);
- Gold — kann man mit echtem Geld kaufen. Man kann auch Helden, Armeen, Artefakte usw. in der Aktion verkaufen;
- Diamanten — erhält man während des Tutorial, bei Quests, bei Ereignissen im Königreich, beim aktivieren von speziellen Artefakten und beim Kauf von Gold. Ein Spieler erhält einen Diamanten an jedem Tag, an dem er sich einloggt.
Alle diese Rohstoffe, mit Ausnahme von Gold, Diamanten und Söldnerpunkte, stehen nur in der jeweiligen Stadt zur Verfügung, d.h. wenn Sie in einer Stadt nicht ausreichend Rohstoffe haben, können Sie dort kein Gebäude errichten oder hochstufen, auch wenn Sie in anderen Städten ausreichend Rohstoffe dafür hätten.
Normale Rohstoffe(Kohle, Eisen, Stein, Holz und Kalk) können für verschiedene Dinge eingesetzt werden, vom Ausbau Ihrer Städte bis zur Ausbildung von Truppen und der Landschaftsveränderung. Unter diesen 5 Rohstoffarten gibt es 2 die wichtiger als die anderen sind, da bei vielen Aufträgen mehr von diesen Rohstoffen eingesetzt werden muss. Dies sind Holz und Eisen. Deshalb sollte jeder Spieler zuerst diese Produktionen auf ein höhere Stufe bringen.
Wenn ein Spieler seine erste Stadt erhält, hat er nur ein Schloß der Stufe 1, 500 Rohstoffe von allen normalen Rohstoffen und keine Produktionsstätten. Unmittelbar danach wird mit dem Bau des Lagerhauses begonnen, so bleiben dem Spieler nur noch 424 Rohstoffe von jedem Typ.
Bei normalen Rohstoffe wird angezeigt prodziert pro Stunde, während Bevölkerung und Söldnerpunkte am Ende des Baues der entsprechenden Gebäude zur Verfügung stehen. Um die Produktionsrate für die normalen Rohstoffe zu erhöhen, müssen die entsprechenden Produktionsstätten auf eine höhere Stufe gebracht werden.
Um dies zu tun, müssen Sie folgende Schritte durchführen:
1) Wählen Sie eines der Rohstoffgebäude aus (Sägemühle, Steinbruch usw.) → 2) Klicken Sie auf das Gebäude → 3)Es öffnet sich das Übersichtbild → 4) Klicken Sie auf den grünen Pfeil(oben rechts)
Erhöhung der Stadtbevölkerung
Die Bevölkerung stellt die Arbeitskraft in Ihrem Königreich dar. Diese wird sowohl zum Bauen und Hochstufen von Gebäuden als auch zum Ausbilden von Truppen benötigt. Es gibt zwei Gebäude, die Ihnen Bevölkerung liefern - Bauerhöfe und Brunnen.
Brunnen können Sie nur einen pro Stadt bauen; er bringt Ihnen 400 Bevölkerung. Er kann nicht hochgestuft werden.
Sie können bis zu 20 Bauernhöfe in jeder Stadt bauen. Auf Stufe 10 ausgebaut bringt Ihnen jeder Bauerhof 360 Bevölkerung (insgesamt also 20*360 = 7200).
Um einen Bauernhof zu bauen, müssen Sie folgendes tun:
1) Klicken Sie auf einen freien Platz (in der Stadtansicht) → 2) Klicken auf das Symbol für den Bauernhof → 3) wenn Sie genügend Rohstoffe haben, beginnt der Bauprozess
Erste Truppen trainieren
Es gibt verschiedene Arten von Truppen im Spiel, diese sind:
- Infanterie;
- Schützen;
- Kavalerie;
- Belagerungswaffen;
- Helden.
Je nach Art der Truppen werden diese in Kasernen, Stallungen und Werkstätten ausgebildet. Andere können im Schloss (oder Obelisk, Ruhmesbrunnen) oder in spezielle Söldnerlagern angeheuert werden. from Castle (Obelisk of Glory/Fountain of Glory. Zu Beginn des Spiels sollten Sie Kasernen bauen und Schwertkämpfer und Bogenschützen ausbilden, damit Sie sich gegeb Plünderer wehren können.
Um Kasernen zu bauen, müssen Sie folgendes tun:
1) Klicken Sie auf einen freien Platz in der Stadtansicht → 2) Klicken Sie auf das Kasernensymbol → 3) wenn Sie genügend Rohstoffe haben, beginnt der Bauprozess
Plündererangriffe abwehren
Plünderer sind Computergesteuerte Gegner, die gerne einfache Ziele angreifen
— Ihre schlecht oder garnicht verteidigten Städte und Forts. Um zu sehen, ob Plünderer Ihre Stadt angreifen, müssen Sie in die taktische Ansicht in Ihrer Stadt gehen. Wenn Plünderer in der Stadt sind, sehen Sie rote Flaggen für diese feindlichen Armeen.
Um die Plünderer zu besiegen, müssen sie folgendes tun:
1) Klicken Sie auf Ihre Armee → 2) Klicken Sie auf die rote Flagge, die die Armee der Plünderer repräsentiert → 3) schauen Sie ob die "gekreuzten Schwerter" und eine Zeit neben der Anzeige Ihrer Armee erscheint → 4) warten Sie bis Ihre Armee den Feind erreicht hat und mit dem Kampf beginnt → 5) sobald der Kampf starte, sieht man unten in der Mitte des Schirm ein Kampfbericht, der Ihnen Informationen über den Fortgang der Schlacht liefert → 5) Sobald der Feind besiegt ist, verschwindet die rote Flagge
Wappen erstellen
Ein Wappen ist ein Symbol das einzigartig eine Person (Familie, Orden, Land)kennzeichnet.
Um Ihr persönliches Wappen zu erstellen, müssen Sie folgendes tun:
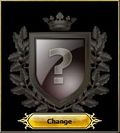
1) Highlight the "Settings" tab → 2) When the menu pops up, click on the "Profile" link → 3) Click on the "Change" button under your current coat-of-arms (which should be empty for now) → 4) The list of available free pre-generated coats-of-arms will appear (it can be scrolled horizontally). Choose the coat-of-arm that you find most appropriate →
5) Push the "Tick" button
Sie können Ihr Wappen auch selbst entwerfen (kostet Gold).
Eine Aktion abbrechen
Jeder Spieler sollte wissen, dass verschiedene Operationen in diesem Spiel abgebrochen werden können. Manchmal startet man aus Versehen eine Aktion, die man so nicht wollte. In diesem Fall kann dies durch Abbruch der Aktion wiedder gut gemacht werden.
Diese Operationen können abgebrochen werden (solange sie noch in der Warteschleife sind):
- Bau von Gebäuden;
- Zerstörung von Gebäuden;
- Hochstufen von Gebäuden;
- Herunterstufen von Gebäuden;
- Ausbildung von regulären Truppen.
Diese Operationen können abgebrochen werden (auch wenn sie schon gestartet haben):
- Zerstörung von Gebäuden;
- Geländeumformung.
In verschiedenen Fällen bekommen Sie dann einen Teil der Rohstoffe zurück:
- Beim Abbrechen einer Geländeumformung: 0% Rückerstattung;
- Beim Abbrechen der Ausbildung von Truppen (die noch in der Warteschleife sind), 75% Rückerstattung;
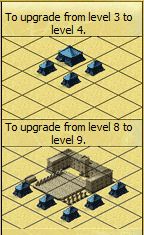
- Beim Herunterstufen eines Gebäudes erhält man 30% der Rohstoffe für die Hochstufung zur jetzigen Stufe zurück (und 100% für die Satellitengebäude, wenn solche da sind). "Satellitengebäude" sind Gebäude von demselben Typ wie das Hauptgebäude, die notwendig für die Hochstufung sind. Kasernen, Stallungen und Werkstätten benötigen solche Satellitengebäude beim Übergang von Stufe 3 nach 4 und von Stufe 8 nach 9;
- Beim Zerstören eines Gebäudes erhält man 30% der Gesamtbaukosten zurück;
- Beim Zerstören eines Ruhmesbrunnes erhält man 30% der Rohstoffe und 100% des investierten Goldes zurück.
Stadt - Taktik
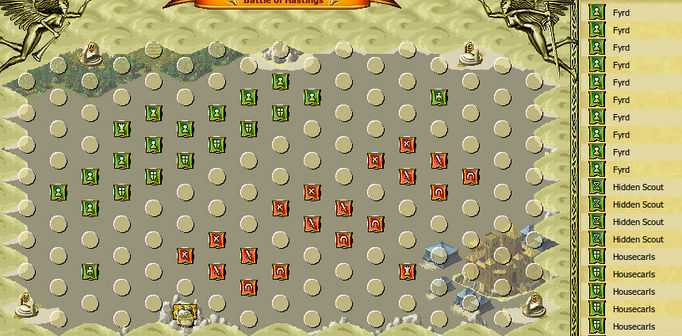
In "City" tab, apart from the already known "Town" mode, there is "Tactics" mode. Tactic mode implies some changes to way you see the location. They are:
- All the background colors become dim;
- The building grid is changed to combat grid, which looks differently and is suited for combat purposes. You can toggle it on and off, just like the City grid — just click the amber stone located in upper right corner of the Tactics screen;
- The combat grid represent all the positions available on the map where armies may move to. Some positions are more beneficial for standing your ground (your walls, rock formations for example), some for movement (gray tiles), so you can use those to your advantage;
- The movement process of any army takes time. The time required to move from one point (circle, where your army is located right now) to another (circle, where you want them to be) is shown in the upper right corner;
- The roads that were present in "Town mode" view, are now shown as "Gates" — these are the points where armies (yours/allied/enemy) enter and leave your city. There are four of them, each for one cardinal point - North, East, South and West;
- All the armies present at the location are being shown as flags:
--- Your hero and armies are marked by green flags;
--- Allied heroes and armies are marked by blue flags;
--- Enemy heroes and armies are marked by red flags;
Armeekontrolle
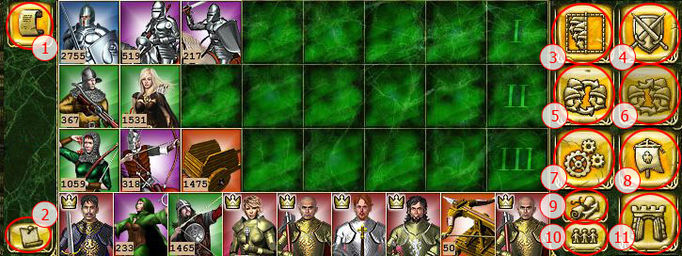
In tactical mode, there are several buttons and menus that help you to handle your armies more effectively:
1.  - this icon toggles between the "battle log" and the "currently selected armies screen" (also known as formation screen) modes;
2. ![]() - this icon has two states, pinned and unpinned (default state). What is does, is makes one of the previously mentioned modes permanently enabled when it is pinned — you will either always see a "battle log" screen or "formation" screen. Note that pushing the 1. button, when this button is "pinned", won't have any effect;
- this icon has two states, pinned and unpinned (default state). What is does, is makes one of the previously mentioned modes permanently enabled when it is pinned — you will either always see a "battle log" screen or "formation" screen. Note that pushing the 1. button, when this button is "pinned", won't have any effect;
3.  - this icon selects/deselects all of your armies on the battlefield;
4.  - this is a menu, that covers some very important tactical features:
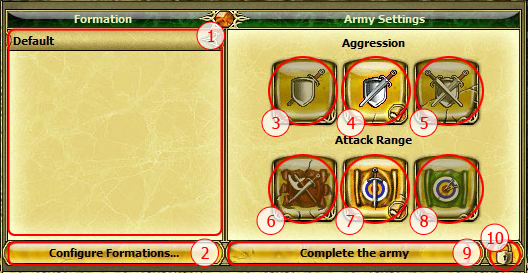
1) - this is your formation list, it shows your predefined battle formations. "Default" formation is available to everyone from the start and your troops will be distributed by four rows according to this formation automatically. You can also configure up to 2(two) formations of your own if you have no subscription and up to 10 formations, if you have Silver or Gold subscriptions.
2) - "Configure formations" button, it will bring up the screen, where you can configure your formations;
3) - "Aggression: low" button sets your army to "stand ground" stance — your soldiers will only attack the enemy if it is in their range (if the correct "Attack Range" option is enabled), but they won't engage them in melee or pursue them;
4) - "Aggression: range" button sets your army to "defensive" stance — your soldiers will attack the enemy, when at least one unit in your army, who has the longest range is able to reach the foe. They will pursue and engage the enemy, but only up to the distance where your longest range units can attack, they won’t engage the enemy in melee by themselves, but they won't evade the charging in enemy either.
5) - "Aggression: high" button sets your army to "attacking" stance — your soldiers will attack the enemy if they know where he is (another army or watchtower spotted the enemy, for example). Whether they will attack in melee or at range is configured by the "Attack Range" buttons;
6) - "Attack range: melee" button sets your army's attack range to 0. This means, that if the correct Aggression option is selected ("range" or "high"), your army will try to tie up the enemy in melee, firing projectiles while they close up with the foe.
Note: never use a combination of "Aggression: low" and "Attack range: melee" without paying attention, because your armies will get nailed with bolts and arrows from the distance, without inflicting any casualties to the enemy. Though, there are cases when you may consciously want to use this combination, for example, you are leveling up in some Adventure Hut location, say Druid Temple, and you see the army of your vassal entering it as an "attacker". This way, your army won't attack him on sight, unless he steps in the same tile your troops are located in;
7) - "Attack range: adaptive" button sets your army's range to the shortest one available (except 0), for example — if you have a Footpad or a Royal Guard in your army, then the minimal range will be set to 1. Your army will start to attack the enemy only from the abovementioned minimal range. You should note that this is a very dangerous mode to use if you are not paying attention to your armies. Using it in combination with "Aggression: low" will ensure that your army won't attack the foes until they come to your minimal range (usually 1 or 2), using it with "Aggression: range" will override your army's "attack from maximum range" settings with the "attack from minimal range" one, ensuring that will try to tie up in melee and eventually get slaughtered;
NPC (Marauders/Adventure Hut) armies use the combination of "Aggression: range" and "Attack range: adaptive", that's why they are relatively easy to beat.
--- I would suggest you never use this "Attack range: adaptive" scenario at all, this way you will prevent a lot of bad things from happening;
8) - "Attack range: ranged" button sets your army's range to the longest one available (usually 4 - the one of the Norman archer). Your army will start attacking the foes from their longest range and won't try to engage them in melee. This is a "good all around" scenario you want to deploy on a regular basis. It allows your armies to shower the enemy with projectiles from a far, while being safe on relatively long distance.
In general situation (when your armies are not specialized in melee only) it might be a good idea to use a combination of "Aggression: low" and "Attack range: ranged", especially when you are not paying attention to the combat. This tactic is also very useful against NPC armies. Of course each player should understand that there is no ideal combination of "Aggression" and "Range" stances that would suit all situations perfectly, one should adjust these settings each time he encounters an enemy;
9) - "Complete the army" button marks your selected army as a regular and a fixed one. This means that when sending campaigns to different locations, "fixed" or "rallied" armies will appear as already predefined ones in the list — the troops that are registered to these armies won't appear in the "Troop pool", they will only be chosen when you choose the whole army from the army list. This is a very important feature, which every player should use eventually;
10) - This button "unfixes" or breaks your regular armies (ones that were "fixed" before), so that troops that are already attached to specific rallied armies may appear in the "Troop pool" again.
5.  - this icon allows you to join two or more selected armies into one. You choose which army will be reinforced with the troops from another army, so the name and the flag of this specific army will stay the same;
6.  - this icon allows you to split one army into two or more (up to ten). You may choose the name of your new armies (the naming rule is: %your_chosen_name% @1-10). If you didn't type in your new army name, then the default one will be used (it is usually Army @N; settings that control the naming rules are located in "Personal → Profile → Settings → Armies naming:);
7.  - this icon opens up the "Advanced actions" menu, which allow you to disband and army or to register it to the current city (if the army is located in one of your cities and this city has enough population to upkeep it).
8.  - this icon opens up the menu, where player can rename one particular army and choose one of 33 available flags for it.
9. ![]() - this icon clears the current battle log and sends a report about it to your cities. Note that this operation can only be done if nobody else is watching this log (another player in the same location). If you still see the log after pushing this button, you need to refresh the page;
- this icon clears the current battle log and sends a report about it to your cities. Note that this operation can only be done if nobody else is watching this log (another player in the same location). If you still see the log after pushing this button, you need to refresh the page;
10. ![]() - this icon toggles on/off the display of your selected armies in the right pane. This option is useful, when you want to see the battle log (in text format) and still be able to see your armies' numbers;
- this icon toggles on/off the display of your selected armies in the right pane. This option is useful, when you want to see the battle log (in text format) and still be able to see your armies' numbers;
11.  - this icon opens up the menu, where player is allowed to choose the destination he wishes to travel to (for example, one of his forts of towns), when he will leave the location he's in right now. Note, that this option will function only when your armies are standing on one of the "Gate" tiles (North, East, South or West).
12. - this button (yes, it is button) quickly changes the way battle log is displayed (back and forth from text view to detailed view). It is very useful function when fighting in great numbers, for example 1000000 troops vs. 1000000 troops;
13. - this button (yep, this is button too) triggers the visibility of the battle grid.
Karte - Tal
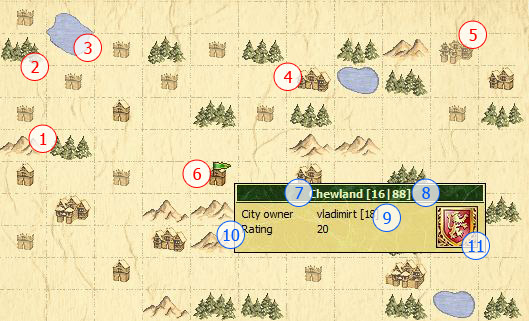
The "Valley" mode, also known as the World Map, shows the world from a bird's eye view. In 1100AD all the world map is divided into so called "Valleys" — areas each 99 tiles x 99 tiles long, where everything, including player forts and towns, landscape features (such as mountains, forests and lakes), NPC locations, event/quest locations is spawned across such valleys. Each valley has a unique number starting from 1 and the new ones (valleys) are generated automatically each time when the ever-growing player amount demands so. This means that "old" players, who probably are very strong right now, are most likely to be distributed among the first 10 valleys.
The "Valley" view screen contains several types of elements:
1. - This is a "mountain" tile, it slows your army movement by 100%;
2. - This is a "forest tile", it slows your army movement by 100%;
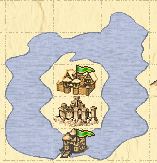
3. - This is a "water" tile, no troops can travel by water. It can be used to create defensive contours that can be locked (guarded) by forts. Note that if you defend your towns using this method, your enemy would only reach your settlements by destroying/sieging your fort(-s);
4. - This is a "town" tile, absence of any flag on top of it indicates that you have no political relationship with this player (he is neutral to you);
5. - This is a "faded town" tile. Faded colors indicate that the player who owns this settlement is active no more (didn't played a game for a while, say plus/minus two weeks);
6. - This is a "town" tile, green flag indicates that it is yours;
7. - This is town's name, on screenshot it is "Chewland";
8. - These are town's coordinates within the current valley. [16|88] means that this town is located on the crossing of 16th row and 88th column of the current valley, which wholly consists of 99 rows and 99 columns.;
9. - This is your total kingdom (commander) rating score;
10. - This is the rating score, which this particular town (the one with the green flag on top of it) adds to your total kingdom (commander) score pool;
11. - This is the place where coat-of-arms icon is being displayed, either your personal one or your Order's (if you happen to be a member of any order).
The flags on top of locations (forts/cities/mercenary camps) indicate to whom do they belong and which relationship stands between you and the particular person who owns the location.
There are 7 types of relationship in 1100AD:
- Green flag with gold border indicates that the object belongs to you;
- Green flag with gold border and crown on top of it indicates that the object belongs to your master (sovereign);
- Green flag without any border indicates that the object belongs to your vassal (you are his master);
- Blue flag indicates that the object belongs to your ally;
- White-blue flag indicates that the object belongs to a person with whom you have sealed a non-aggression pact;
- White flag indicates that the object belongs to a person with whom you have a truce;
- Red flag indicates that the object belongs to your enemy;
Note: If you are a member of an order, then your relationship with different players will be automaticly enriched with ones of the order (you will inherit all the allies and enemies of the order).
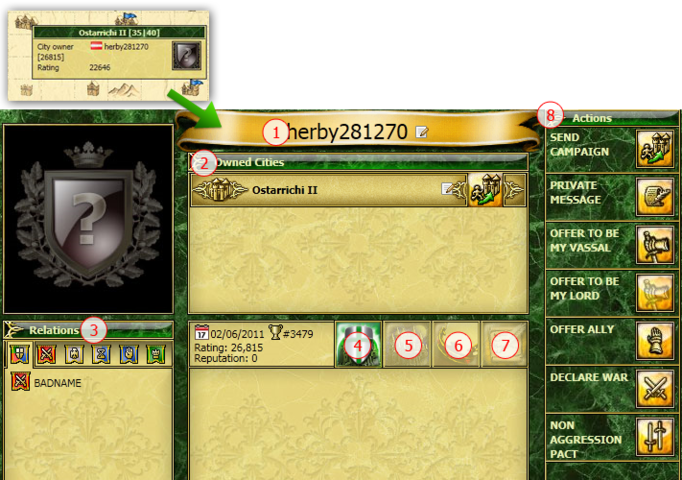
Clicking on player's town or other location on the valley map, will bring you to his profile page:
1. Player's in-game nickname (you can change it if you have Silver or Gold subscription, the changes will only be shown to you);
2. List of player's owned forts and cities (you can also rename them if you have a Silver or Gold subscription, but the changes will only be shown to you);
3. Player's relations with other players;
4. Player's protections are shown here. There can be Newbie protection (protection from attacks), protection from powerful attacks and protection from building demolishing;
5. This icon shows if player has any hidden locations;
6. This icon indicates whether player has any subscriptions (Newbie, Silver or Gold);
7. This icon shows which languages player speaks or understands.
8. This is "actions" menu, it shows you a list of available actions you can perform with regard to this player:
1) Send campaign — this button will open up "Valley - Attack" screen, where you can choose whether to attack or aid a player;
2) Private message — this button will open up your mailbox and initiate the private message form (letter);
3) Offer to become my vassal — this icon will open up a menu, where you can offer another player to become your vassal;
4) Offer to become my lord — this button will open up a menu, where you can offer another player to become yourbr/
- Wood br/ menu, which allow you to disband and army or to register it to the current city (if button sets your army to  the army is located in one of your cities and this city has enough population to upkeep it). sovereign (master);
5) Offer an alliance — this icon will open up a menu, where you can offer another player to become your vassal;
6) Dec view, are now shown as formationbr/lare war — this icon wiVallbr/eysll open up a menu, where you can declare a war to a player;
7) Non-aggresion pact — this button will open up a page, where you can offer a player to sign a non-aggression pact.
Valley navigation
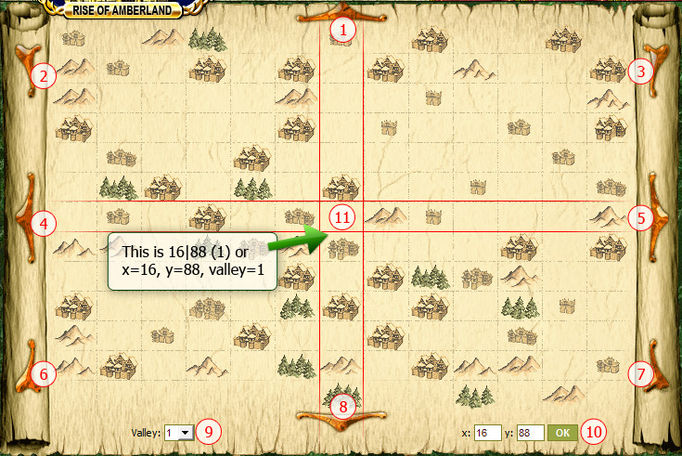
Navigation in valleys can be done in two ways - by using amber arrows around the valley screen or by inputting coordinates manually, using the corresponding forms. Navigation via arrows moves the map viewport by 3 tiles (these are default settings, you can change them in Personal → Profile → Settings → Map scrolling speed) in chosen direction.
The valley navigation elements are:
1. North arrow - moves the map viewport north;
2. North-west arrow - moves the map viewport north-west;
3. North-east arrow - moves the map viewport north-east;
4. West arrow - moves the map viewport west;
5. East arrow - moves the map viewport east;
6. South-west arrow - moves the map viewport south-west;
7. South-east arrow - moves the map viewport south-east;
8. South arrow - moves the map viewport south;
9. Valley dropdown box - opens up valley dropdown box, where you can choose which valley to observe;
10. x and y coordinates - fields where you can input coordinates of object you are eager to find on the map;
11. Current x and y coordinates' position on the map, as you see they totally correspond with ones that are inputted near the 10 marker.
Karte - Angriff
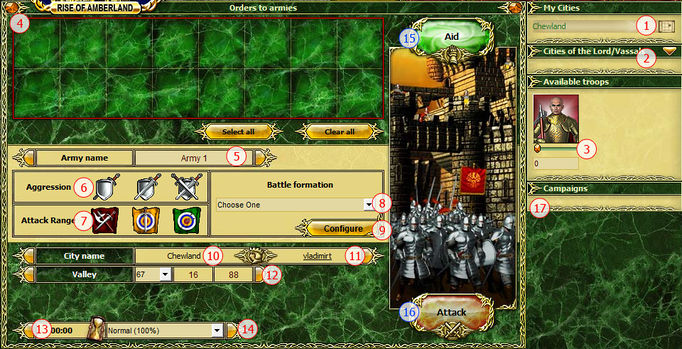
By selecting a location (town/fort/mercenary camp/adventure hut) on the valley map or by choosing Map → Attack, player can enter "Attack" screen, where different options are available:
1. This is the list of your locations, the string in green indicates the name of the location, the map icon - targets the current campaign to the chosen location (automatically fills in the data in the areas marked as 10, 11 and 12);
2. This button is a drop-down list (you may have to click it a few times, before it opens up, so stay patient) of your lord's, vassals' and order battle brothers' locations. They are displayed in the same manner as yours (marked as 1 on screenshot), so the functionality of this menu stays the same as of "My Cities" one;
3. This list, also known as "Troop pool" shows the troops available to you in the chosen location (you choose it in the "My Cities" menu, which is marked as 1 on the screenshot). Note that fixed (rallied) armies are not shown here, they are shown lower in the "Armies" menu.
4. This is your selected armies screen (the ones you've chosen in the "Troop pool" or from "Armies menu"). You can use the "Select all" button, to select all the troops and heroes available in the chosen location and "Clear all" button to clear the currently selected armies (the list will become empty);
5. From the selected troops (the ones that are shown in the area marked as number 4 on screenshot) you can create an army, here you can enter its name;
6. This menu allows you to configure the aggression level of the army you are creating/editing right now;
7. This menu allows you to configure the preferred attack range of the army you are creating/editing right now;
7. This menu allows you to configure the battle formation that will be used by the army you are creating/editing right now;
8. The "configure" button allows you to apply all the settings you've configured in the areas that are marked as 4, 5, 6, 7 and 9 on the screenshot;
10. This is the name of the location, where your current campaign is targeted to;
11. This is the name of the location's owner (you/another player/adventure hut/noCommander), where your current campaign is targeted to;
12. These are the coordinates of the location, where your current campaign is targeted to;
13. This field shows you how much time will take your current campaign to reach its destination;
14. This drop-down box will let you choose the speed you want your army to move with. There are several options available here, the ones above 100% cost gold (105% - 1 gold, 111% - 3 gold, 125% - 5 gold, 142% - 10 gold, 200% - 50 gold). This menu is very important, especially during team battles, when you need to arrive at the same location approximately (+/- some minutes) at the same time as your team mates do;
15. This is "Aid" button, it will send your army as a Defender to aid someone (your ally);
16. This is "Attack" button, it will send your army as an Attacker to attack someone.
Politik – Vasallen (Relations)
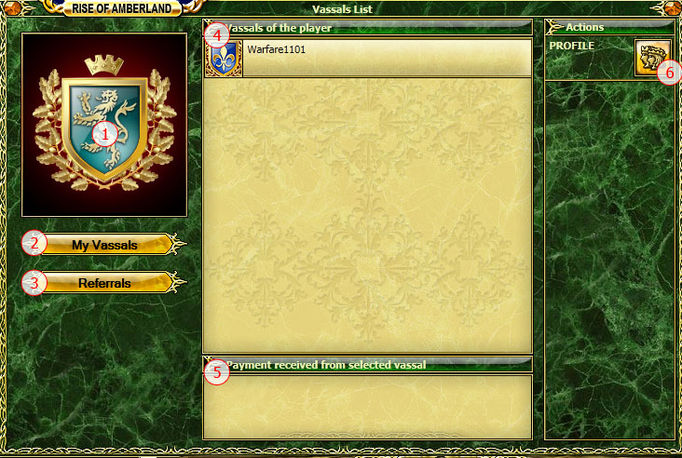
Wenn Sie Politik → Vasallen selektieren, sehen Sie eine Liste Ihrer Vasallen. Vassals are players that agree to pay taxes (this option is not a mandatory, though) to a stronger player in return for their patronage. If you don't want to become somebody's vassal — do not, but consider doing so in times of big trouble, when other players are trying to defeat you. In order to become a feudal lord and have vassals yourself, you need to build a level 1 Obelisk of Glory and fill it with resources first.
This page allows you to control and observe several things:
1. This is your personal coat-of-arms, you cannot change it from here, you can only observe it;
2. This button will update the page to show you your vassal list (on screenshot, Warfare1101 is a vassal of some other player). If you don't have any vassals yet, then the list will be empty;
3. This button will update the page to show you your referral list. The 5th section on the screenshot will be changed to "Your referral link", and the vassal list will be changed to "Referrals of the player" list. Same as before — if you don't have any referrals yet, the list will be empty. The referral program itself is a very beneficial thing — it allows you to invite other people to play 1100AD. If they start to play because of the hyperlink you have provided them with, they will become your referrals and thus — give you some bonuses:
1) If your referral buys gold, you receive 30% of bonus diamonds given to the referral during the purchase (referral will still get his diamonds too);
2) When your referral acquires 3rd, 5th, 8th cities, you will receive the following diamond bonus: 20 diamonds for the 3rd city, 50 diamonds for the 5th city and 100 diamonds for the 8th city;
3) While your referral owns more than 3 cities, you receive a certain amount of random basic resources once a day.
4. This is your vassal/referral list;
5. This area shows you the total tribute your single specific vassal paid to you. You need to click on a player in the vassal list in order to update the information in this area;
6. This button will open up your selected referral/vassal player profile.
Politik – Orden
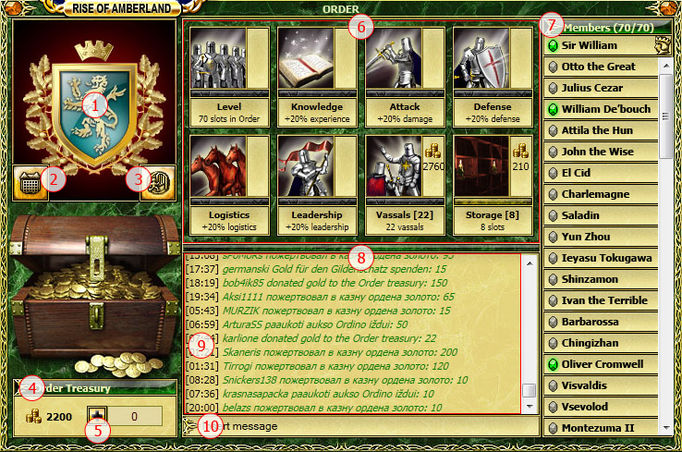
Wenn Sie Politik → Orden selektieren, öffnet sich die Ordensseite des Spiels. If a player is not a member of some Order then this page will offer him to create his own Order for 1000 gold and become its master. Coat-of-arms of the Order master becomes the global coat-of-arms of the whole Order. If a player already owns an Order (is a master of his own Order) or is a member of some, then this screen will allow him to perform several actions:
1. This is your personal coat-of-arms, you cannot change it from here, you can only observe it;
2. This button will open up Order's artifact treasury. NOTE: Only the master of Order or specially assigned order member can transfer artifacts from the storage;
3. This icon allows you to leave the Order;
4. This area shows you how much gold there is the Order's treasury. Only the Order master can spend this money;
5. This button allows you donate some sum of gold to the Order's treasury;
6. This area includes all the available bonuses of the Order. Each of the Order bonuses can be leveled up using gold from the Order's treasury (most of the bonuses have a level cap of 20, "Slots in Order" has a level cap of 70, "Vassals" has a level cap of 33 etc.). Each member of the Order benefits from these bonuses, so it is better to be accepted in a big and powerful order than in a new and small one.
7. This is the full list of the Order members. The green stone shows who's online, the gray one - who is offline;
8. This is your Order's chat, a very convenient tool that allows you to stay in touch with your Order members. It automatically converts the coordinates you have entered, or player nickname (if you use the correct format: [x,y,valley] or x|y(valley) - for coordinates and [user=username1] for user profile) into a hyperlink , which is very useful;
9. A timestamp, it shows you when each player leaved a message in the chat. The time zone, which is used in the chat is GMT+0 or "Greenwich" time, which happens to be the server time as well (server time is shown in the right part of the footer);
10. This is a field where you enter your message, which will appear in the chat, when you push the "Enter" button. If you push on an Order member's name (area marked as "7" on the screenshot) the message you have typed will be wiped and that player's name will appear there instead.
Personal - Messaging
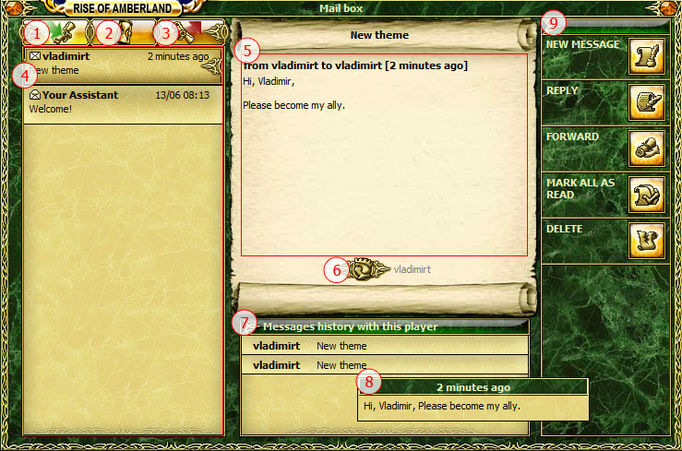
By selecting Personal → Messaging, player will enter his "Mail box", where he can communicate with other players from the server he plays on (for example - Beta). NOTE: players without subscription may store up to 50 messages in each of their mail boxes (Private Messages, Action Messages and Sent Messages), while players with Silver or Gold subscriptions may store up to 100 messages. This screen offers several options:
1. This icon will lead you to your "Private Messages" screen, which is basically your normal Inbox screen, where you can see all the messages sent to you by other players;
2. This icon will lead you to your "Action Messages" screen, where all the political, order, subscription and vassal messages go;
3. This icon will lead you to your "Sent Messages" screen, where you can see all your previously sent messages;
4. This is your received/sent messages section, here you can choose which message to read;
5. This section shows you selected message's title, body and time it was received;
6. This icon indicates the name of the player who's sent the particular message;
7. This section shows you brief history of your mail with another player;
8. This section gives you a quick preview of selected message (you need to hover your mouse over one of the messages shown in the 7-th area of the screenshot). The message body and time it was sent are shown here.
9. This section allows you to create a new message (NEW MESSAGE), reply to an existing one (REPLY), forward a message (FORWARD), mark all your messages as read (MARK ALL AS READ) and delete a single message (DELETE).
Personal - Profile
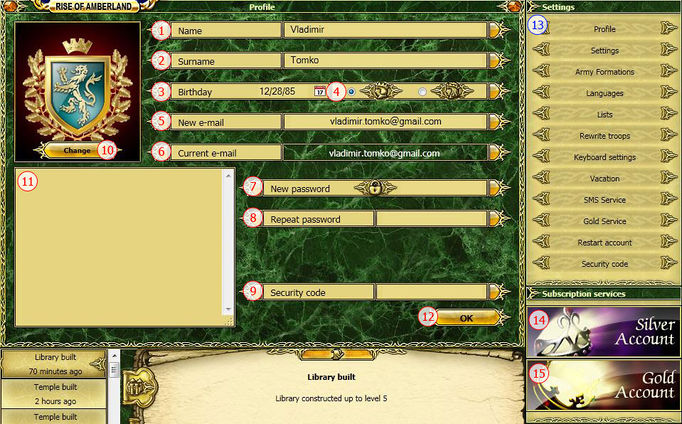
By selecting Personal → Profile, you will enter the game settings screen. There are a lot of options and settings that can be tweaked here (you can learn about them all in the "Game Settings" section of the Wiki):
- Profile — this page allows you to enter your personal data (Name, Last name, e-mail, gender etc.), change your password and create/change your personal Coat-of-arms;
- Settings — this page allows you to change your map (Valley) scrolling speed, game update frequency, enable/disable "Tip of the day" feature, enable the "City view", allow your troops to act as transport for looted goods, change your army naming policies and "army control lag" options, enable/disable graphical combat logs, hide/unhide the right panel of the tactics screen and configure the time needed for an active campaign to become inactive;
- Army Formations — this page allows you to configure your army formations (create new ones, edit or delete existing ones);
- Languages — this page allows you to set the languages you speak (up to five), configure your preferred language of the game user interface and change your country flag (for 200 gold);
- Lists — this page allows you to look through and unblock the players (if needed) previously blocked in the "Messaging" screen;
- Rewrite Troops — this page allows you to register your armies from one city to another (choose which city's population resource will be used by selected army). The register option is free for Gold subscribers and it costs 75 gold for everyone else;
- Keyboard Settings — this page is only available to Silver and Gold subscribers and it allows you to configure your in-game keyboard shortcuts (from 0-9);
- Vacation — this page allows you to configure the amount of days you wish to pick for your vacation (how much time you want to spend not playing the game, without fearing that somebody might attack you). The minimum time of vacation is 5 days and maximum is 23 days;
- SMS Service — this page allows you to enter your cell phone number where you want to receive short text messages from the server that notify you about some of the in-game actions. It also allows you to configure the options that define when exactly the SMS is going to be sent (each SMS costs 7 gold);
- Gold Service — this page allows you to buy gold and subscribe to one of the available in-game subscriptions (Silver or Gold). It also shows you how much gold you have on your account;
- Restart Account — this page allows you to restart your account and choose the valley where you want your first town to appear after the restart. If you wish to choose the exact valley where you wish to spawn, it will cost you 200 gold, if you wish it to be random, it will be done for free;
- Security Code — this page allows you to set your security code (NOTE: this is very important and should be done immediately after you start playing the game).
Hilfe – Foren
Wenn Sie auf Hilfe → Foren klicken, gelangen Sie in den Forenbereich des Spiels. Hier können Sie interessante Informationen über das Spiel, Ankündigungen, die neuste Programmversion und mehr erhalten. Sie können dort auch erfahrene Spieler um Ratschläge und Hilfe bitten.
Hilfe - Hilfe
Wenn Sie auf Hilfe → Hilfe klicken, gelangen sie zur 1100 AD Wissensbasis auch bekannt als 1100 AD Wiki. Hier bekommen Sie sehr viele nützliche Informationen über das Spiel. Sie sollten sich zumindest etwas Zeit nehmen, diese Seiten anzuschauen. Sie werden dann viel mehr Spass am Spiel haben.
Welche Gebäude gibt es und welches ist ihre Rolle im Spiel?
Basic Buildings
Castle
Castle is the most important building of your town. It is required for your settlement to operate. If your castle is destroyed, then the town disappears too. Castle controls several things in your city:
- it provides you 50 population, 100 resource storage and 10 of each resources per hour;
- it is the place where you hire your first hero. If your hero (or all of your heroes) has fallen, then castle is the place, where you can resurrect him (or only one of many, if you have all of your heroes fallen) for free, but you have to wait 15 minutes from the time of his death in order to do so;
- it provides you with your "Hero" screen, where you can see your hero's stats, improve or alter his skills, manage his items and switch between all of your other heroes;
- shows your current building rate (upgrading your castle increases it, and on castle level 20, you will have 147%);
- allows you to hire basic mercenaries (the ones that doesn't require special locations such as Teuton Castle or Barbarian Settlement). In order to unlock this option you need to build an Obelisk of Glory or Fountain of Glory in that town;
- allows to terraform terrain (you need castle level 6 and higher in order to do that);
- allows you to store and manage artifacts brought to the castle's treasury.
Castle takes 2x2 tile space on your town grid and it doesn't grow in size during upgrades.
You can only build one Castle in your town.
Storehouse
Storehouse is the second most important building of your town — it allows you to store basic resources. Some buildings and upgrades require a lot of these resources in order to be completed and in case your storehouse cannot hold the necessary amount, you won't be able to build those. Storehouse is needed for:
- your settlement to operate properly, because some buildings and building upgrades require a storehouse of certain level to be built;
- storage of all your basic resources;
- showing the information about the resource income (per hour) and expenses (including the population and mercenary points). This information can be accessed from the "Resources" tab of the building;
- showing the information about the type and count of buildings constructed in your town. This information can be accessed from the "Information" tab of the building.
Upgrading this building increases the maximum amount of resources it can hold, on the 20th level, the storehouse is capable of holding 29 900 resources, which in pair with castle's storage of 100 resources ends up with 30 000 of each resource storage cap for the city/fort. It can be further expanded by building and upgrading Srongbox which cost gold;
- your storehouse can be robbed by other players during the raid, so it would be wise to protect the building with walls. You can pillage other players' storehouses for personal profit too.
Storehouse takes 1x1 tile space on your town grid and it doesn't grow up in size during upgrades.
You can only build one Storehouse in your town.
Farms
Farms are some of the most essential buildings of your town — they provide the "population" resource which is required for numerous things. Player needs to know some facts about this building to use it effectively:
- population resource the farms provide is required for constructing buildings, upgrading buildings and training troops;
- there is no gathering rate for population resource, it is added permanently when you build a new farm or upgrade an existing one;
- population numbers go down while you develop your city and build troops, so you need to construct farms periodically in order to provide the needed amounts of this resources for your city to prosper;
- each farm should be placed on the town grid and constructed separately, so you need to plan your city wisely;
- upgrading each farm increases the overall population of your town;
- each fully upgraded farm provides 360 population;
- with maximum number of fully upgraded farms in your town you will have 7 250 population (7 650 population if a Well will be constructed too).
Farm takes 1x1 tile space on your town grid and it doesn't grow in size during upgrades.
You can only build up to 20 farms in your town.
Well
Well is another type of building that provides your town with population. It supports the city with source of clean and fresh water. There are some things each player should know about this building:
- it adds a +400 population for your town and can be built rather early in the game, which makes this building very effective early on;
- upon building this construction, your town becomes "active" for a specific event to appear — - each 2 weeks thieves in your city steal something from the merchants and hide it somewhere in the tunnels beneath the well. You are asked by the merchants to explore the well with your hero to get their stolen resources back, but beware — thieves may attack you.
Well takes 1x1 tile space on your town grid and it cannot be upgraded.
You can only build only one well in your town.
Rohstoffabbau
In order to extract resources in your city, you need to build special resource gathering buildings. There are five of them. They are:
Lime Oven
This building is used for producing lime. Upgrading this building increases the production rate of lime resource (per hour). The higher the level of building, the more resources it produces. This construction can be upgraded up to level 20, the production rate on this level will be 570 lime per hour (or 741 per hour if you have Gold Subscription).
Lime Oven takes 1x1 tile space on your town grid and it doesn't grow in size during upgrades.
You can only build only one lime oven in your town.
Coal Mine
This building is used for producing coal. Upgrading this building increases the production rate of coal resource (per hour). The higher the level of building, the more resources it produces. This construction can be upgraded up to level 20, the production rate on this level will be 570 coal per hour (or 741 per hour if you have Gold Subscription).
Coal Mine takes 1x1 tile space on your town grid and it doesn't grow in size during upgrades.
You can only build only one coal mine in your town.
Sawmill
This building is used for producing wood. Upgrading this building increases the production rate of wood resource (per hour). The higher the level of building, the more resources it produces. This construction can be upgraded up to level 20, the production rate on this level will be 570 wood per hour (or 741 per hour if you have Gold Subscription).
Sawmill takes 1x1 tile space on your town grid and it doesn't grow in size during upgrades.
You can only build only one sawmill in your town.
Quarry
This building is used for producing stone. Upgrading this building increases the production rate of stone resource (per hour). The higher the level of building, the more resources it produces. This construction can be upgraded up to level 20, the production rate on this level will be 570 stone per hour (or 741 per hour if you have Gold Subscription).
Quarry takes 1x1 tile space on your town grid and it doesn't grow in size during upgrades.
You can only build only one quarry in your town.
Iron Mine
This building is used for producing iron. Upgrading this building increases the production rate of iron resource (per hour). The higher the level of building, the more resources it produces. This construction can be upgraded up to level 20, the production rate on this level will be 570 iron per hour (or 741 per hour if you have Gold Subscription).
Iron Mine takes 1x1 tile space on your town grid and it doesn't grow in size during upgrades.
You can only build only one iron mine in your town.
General structures
Cache
Cache is another resource storage building, but it acts differently from the Storehouse. Cache hides a portion of your resources (the one that is stored in the Storehouse) from the robbers, it doesn't increase the maximum capacity of resources available to the city, though. The building can be upgraded up to level 20, when it can hide up to 3 850 resources of each type.
Cache takes 1x1 tile space on your town grid and it doesn't grow in size during upgrades.
You can only build only one cache in your town.
Strongbox
Strongbox is additional Storehouse that can be built in the city. It has some differences from the original storehouse, though:
- strongbox has only 5 levels comparing to storehouse's 20;
- building this construction costs gold, 70 at start and 50 for each upgrade, which makes it a total of 270 gold needed to build a fully upgraded strongbox;
- fully upgraded strongbox can hold up to 25 000 of each resource, which makes this building very important;
- strongbox can also be robbed just like the storehouse;
Strongbox takes 1x1 tile space on your town grid and it doesn't grow in size during the upgrades.
You can only build only one strongbox in your town.
Marketplace
Marketplace is a building that allows you to trade with other players' settlements. It provides several bonuses:
- it allows the town, where marketplace is built, to be supplied with resources from your other cities or forts for free;
- it allows you to trade resources with other players;
- it allows you to exchange one resource for another, the rate is 15:1 if you wish to do it for free, or 1:1 if you prefer to pay extra gold for it (you need to pay same 10 gold when you exchange the amount of resources from 1 to 30 000, 20 gold for 30 001 to 60 000 etc.);
- it provides an extra storage of resources, but they apply only on those gathered by trade. It means, that if you have a trade order that is to deliver 15 000 of each resource in your town and your storehouse is already full, you will still be able to receive and store those in the market and they won't disappear;
- each upgrade increases the amount of resource storage (15 000 on level 20) and resource transferring capacity (15 000 on level 20) the market can handle.
To place an order on the market, do the following:
1)click on the “My Orders” button at the bottom right part of the market page → 2) select the resources you want to receive and the ones you are willing to trade in return → 3) click on the "Publish trade order to the market" button (two arrows following each other in the circle) to make your order available to the public
Marketplace takes 1x1 tile space on your town grid and it doesn't grow in size during the upgrades.
You can only build only one marketplace in your town.
Repair Squad
Repair Squad is a building that allows you to repair the damage done to the buildings by rams/catapults/ballistae/trebuchets. This building can:
- repair the damage done to your city by siege engines. The repair rate is measured in seconds and it caps at 1 hit point per 5 seconds when building has reached level 10 (3 HP per 5 seconds if you have three repair squads in your town/fort);
- dig underpasses between your forts, towns and mercenary camps. The digging costs you gold and time (the amount varies depending on the distance to location you dig the underpass to). You can also dig underpasses to your vassals' and order members' locations. Underpasses cut travel time between the locations it connects by 30-50%. NOTE: underpass remains constructebr/
d and usable if your city was captured by other player, so buildbr/
- it provides you with your thowidth:682px; margin: 0 auto;se at your own risk.
- upgrades increase the building repair rate the Repair Squad provides.
Repair Squad takes 1x1 tile space on your town grid and it doesn't growdisplay: inline; float: right; padding: 0 7px/div 0 20px; margin: 1px 0 0 0; clear: right up in size during the upgrades.
You can only build only three marketplace in your town.
Obelisk of Glory
Obelisk of Glory is a very important building, it allows you to gain access to another type of military units — mercenaries. It also provides the player with several options:
- it takes a lot of your population resources, but gives mercenary points in return (on level 20 it provides you with 6 890 mercenary points);
- after you have built the construction and filled the vassal tab with enough resources to level up, you are allowed to accept vassals and capture/build mercenary camps;
- it allows you to raise your vassal points by paying gold;
- it allows you to gain access to the "Mercenaries" tab of the castle, where you can hire basic mercenary units;
- it allows you to buy non-basic mercenary units (the ones that are provided by mercenary camps, such as Slaves, Teutonic Knights, Knights Templar etc.).
Obelisk of Glory takes 1x1 tile space on your town grid and it doesn't grow in size during the upgrades.
You can only build only one Obelisk of Glory at all (not per city, but per commander).
Fountain of Glory
Fountain of Glory is a building that provides you with mercenary points. It is very expensive on population resource, though. There are few things each player needs to know about this building:
- while Obelisk of Glory cannot be built more than once, Fountain of Glory can be constructed in every city, though it is not recommended to build it in town where you have an upgraded Obelisk of Glory constructed, because together they will eat up a lot of population and you won't be able to recruit any non-mercenary troops from that settlement anymore;
- building and upgrading of this structure costs gold, 120 for foundation and 100 for each level upgrade, so fully upgraded building will cost you 520 gold;
- the maximum level of the building is 5th, at which it will provide you with 4800 mercenary points (without modifiers);
- initially, it is not profitably to build a Fountain of Glory, because this building is not an essential one and it takes 450 population, while giving back only 300 mercenary points (ratio 1.5:1), but this building has a special property — each Fountain of Glory in your kingdom (starting from the second one) provides itself with a mercenary point bonus of 10% (modifier). This means, that 2 Fountains of Glory will give you a mercenary point bonus of 10%, 3 buildings will provide you a 20% etc., so when you will have 6 Fountains, the population-mercenary point ratio will be 1:1. From this point on, it will be profitably to build this structure. When you have 12 cities with Fountains of Glory in each, the mercenary point bonus of this building will be 100%, which is extremely beneficial.
Fountain of Glory takes 1x1 tile space on your town grid and it doesn't grow in size during the upgrades.
You can only build only one Fountain of Glory per city.
Tavern
Tavern is a fine establishment where different heroes from all over the kingdom visit to relax and drink a mug of ale or two; This building provides you with some options and bonuses:
- here you can hire additional heroes. Each new hero will cost you 10 gold and take 5 gold for upkeep (if he is out of the "Free hero" rule's reach);
The free hero rule:
1) Each player without subscription has one free hero;
2) Each player with Silver subscription has two free heroes;
3) Each player with Gold subscription has four free heroes;
4) Each player, regardless of subscriptions gains one additional free hero for each city starting from 8th.
- tavern provides your city with a morale bonus (it affects the number of troops in your army attacking simultaneously). The maximum morale bonus a tavern can provide is 115% (on level 5);
- tavern allows you to see the total amount of your troops and heroes, their total number of hit points, attack damage and capacity (how many resources units can carry with them). This information is available in the "Armies" tab of the tavern;
- tavern allows you to gain access to the auction, where you can buy and sell troops, mercenaries, heroes and artifacts;
- tavern is required to be able to construct the library.
- tavern also allows you to resurrect fallen heroes for free, but they will lose all their experience which lies between their current level and their next level upon the resurrection (it means that if you have a 25th level hero, who has 99% of the required experience needed to reach level 26, he will lose all this experience upon the resurrection in tavern);
Tavern takes 1x1 tile space on your town grid and it doesn't grow in size during the upgrades.
You can only build only one tavern per city.
Tempel
Temple is the building that allows you to resurrect your fallen heroes and improve your kingdom's reputation. There is something each player should know about this construction:
- temple allows you to donate basic resources or gold to improve your kingdom's reputation (each building's upgrade reduces the amount of resources needed to improve your reputation by one). Reputation is needed to declare wars, offer and sign agreements, accept vassals and build towers (mark towers);
- you will need to donate resources to the temple eventually, because someday your reputation will get low enough to block the ability to take vassals or declare wars;
- temple allows you to resurrect your fallen heroes without the reputation loss (with temple level 5, it will cost you 100 gold to resurrect a single hero).
Temple takes 1x1 tile space on your town grid and it doesn't grow up in size during the upgrades.
You can only build only one temple per city.
Sammelpunkt
The rally point is a place (a building, actually), where all of your troops, carts and siege weapons gather when they are trained. All of your coming to your city/fort units will also arrive at the rally point.
Rally Point takes 1x1 tile space on your town grid and it cannot be upgraded.
You can only build only one rally point per city.
Library
Library is one the most important and key buildings in the game; it is capable of doing a lot of complex actions that are described in detail in the Library section of the Wiki. In general, library increases the knowledge level of your kingdom and there are few things each should know about this structure:
- by donating basic resources (same amount of each type) to the library, you fill up the knowledge bar of your kingdom. Once the bar hits 100%, you reach the next level and are allowed to build/capture one more city and then, the process starts again, requiring more and more resources for the next level each time;
- at start, first level library works only at its 10% efficiency, so you should avoid donating any resources to this institution before fully upgrading it first (to 10th level);
- this building allows you to automate some of the processes of your city, but you need to assign a hero for this (luckily, the hero is only assigned formally, he doesn't need to stay in the city to perform his duties in the library). It is possible to automatically collect the resources from your storehouse and spend it on services of one of these buildings: Library, Temple, Obelisk of Glory, Barracks, Stables or Workshop. Resource distribution is not 100% effective thought, but it is possible to get it to 95% rather easy, if you have a Gold subscription. This service comes very handy if you are not able to play the game for day or two, but want to invest your resources into something valuable, such as training troops or increasing your kingdom's knowledge level. NOTE: this option doesn’t work if you are online.
Library takes 1x1 tile space on your town grid and it doesn't grow up in size during the upgrades.
You can only build only one library per city.
Militärgebäude
Kasernen
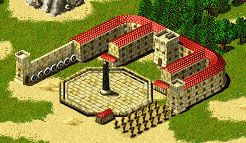
Barraks is a military building that produce regular, non-mercenary infantry. It can produce six types of units:
- Ranger;
- Pikeman;
- Archer;
- Marksman;
- Swordsman;
- Man-at-Arms;
Upgrading this building will increase the maximum number of troops that can be trained simultaneously — one at first level, two at second, three at third and so on, ending up with ten on tenth level of the building.
Barracks is a multicellular building and it increases in size during some of its upgrades, it takes 1x1 tile space on your town grid on levels 1-3, 2x2 tile space on levels 4-8 and 3x3 tile space on levels 9-10.
You can build as many as you wish barracks per city.
Stallungen
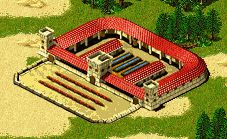
Stables is a military building that produce regular, non-mercenary cavalry. It can produce three types of units:
- Scout;
- Horseman;
- Knight.
Upgrading this building will increase the maximum number of troops that can be trained simultaneously — one at first level, two at second, three at third and so on, ending up with ten on tenth level of the building.
Stables is a multicellular building and it increases in size during some of its upgrades, it takes 1x1 tile space on your town grid on levels 1-3, 2x2 tile space on levels 4-8 and 3x3 tile space on levels 9-10.
You can build as many as you wish stables per city.
Workshop
Workshop is a building that produce regular, non-mercenary machines. It can produce three types of units:
- Catapult;
- Ram;
- Cart.
Upgrading this building will increase the maximum number of troops that can be trained simultaneously — one at first level, two at second, three at third and so on, ending up with ten on tenth level of the building.
Workshop is a multicellular building and it increases in size during some of its upgrades, it takes 1x1 tile space on your town grid on levels 1-3, 2x2 tile space on levels 4-8 and 3x3 tile space on levels 9-10.
You can build as many as you wish workshops per city.
Verteidigungsgebäude
Mauern
Wall is a basic defensive building, it allows you to protect different parts of your town from the enemies. Walls can significantly slow down enemy armies. There are few things one should know about walls:
- walls can be passed (climbed) only by infantry. Carts, siege weapons and cavalry cannot travel through this obstacle;
- walls can be destroyed only by siege engines (rams, catapults, trebuchets and ballistae);
- when fighting on walls your infantry receives a defensive bonus (hit points are increased) as follows: 1.15 times on level one wall (wooden), 1.55 times on level two wall (stone) and 2 times on level three wall (orange tiled);
- each upgrade increases the hit points of the wall (500 on level 1, 2500 on level 2 and 10000 on level 3) and the defensive bonus it provides.
Wall takes 1x1 tile space on your town grid and it doesn't grow in size during the upgrades.
You can build as many as you wish walls per city.
Stadttore
Gates is another basic defensive building; it is fortified more heavily than any other part of the wall and allows the allied forces to pass through your fortifications freely. There are few things each player should know about gates:
- gates can be passed (climbed) only by infantry. Carts, siege weapons and cavalry cannot travel through this obstacle;
- gates can be destroyed only by siege engines (rams, catapults, trebuchets and ballistae);
- when fighting on gates your units receives a defensive bonus (hit points are increased) as follows: 1.5 times on level one gates (wooden), 2 times on level two gates (stone) and 2.5 times on level three gates (orange tiled);
- each upgrade increases the hit points of the gates (1000 on level 1, 5000 on level 2 and 20000 on level 3) and the defensive bonus it provides.
Gates takes 1x1 tile space on your town grid and it doesn't grow in size during the upgrades.
You can build only five gates per city.
Wachturm
Watchtower is a building that gives you additional line of sight in your city or fort during the battle. This structure is very important because it gives you advantage over your enemies and allows you to catch them unprepared. Each player should know a few things about this construction:
- watchtower can be passed (climbed) only by infantry. Carts, siege weapons and cavalry cannot travel through this obstacle;
- watchtower can be destroyed only by siege engines (rams, catapults, trebuchets and ballistae);
- watchtower can be upgraded to 5th level, and while first two upgrades don't cost any gold, others, starting from 3rd - do. You need 25 gold to upgrade the watchtower to level 3, 50 gold to level 4 and 75 gold to level 5, ending up with a sum of 150 gold for fully upgraded tower;
- the building provides line of sight of 1 on first level, of 2 on second level, of 3 on third, of 4 on fourth and of 5 on fifth, thus making a fully upgraded watchtower a very strategically important building in the game;
- just like the walls and the gates, watchtower provides a defensive bonus for your troops. The bonuses are: 1.2 times on level one watchtower, 1.4 times on level two, 1.6 times on level three, 1.8 times on level four and 2 times on level five;
Watchtower takes 1x1 tile space on your town grid and it doesn't grow in size during the upgrades.
You can build only two watchtowers per city.
Diplomatie
Pact of Alliance (Alliance)
This pact makes a classic alliance between you and other player:
- you are able to aid each other and visit each other's cities freely;
- you can't attack your allies in neutral or enemy locations, nor can they you (there is an exception, though, if one of the pact members has sent an army to attack a city, and other one to aid it with his forces - they will engage in battle with each other);
- time it takes to break a pact of alliance — 1 day or upon acceptance of pact's second member;
- it doesn't cost you anything to offer an alliance, but it will cost you 10 reputation to break one;
- there is no reputation requirements for offering and alliance. This means that you can have a very bad reputation (say -129) and still be able to offer an alliance.
Non-Aggression Pact
This pact implies some restrictions on your aggression towards other pact members:
- player cannot attack forts and cities of other member of the pact;
- your armies will engage other pact member’s armies, if you meet them on the neutral grounds (adventureHut locations, neutral city etc.)
- time it takes to break a non-aggression pact — 1 day or upon acceptance of pact's second member;
- it doesn't cost you anything to offer a non-aggression pact, but it will cost you 5 reputation to break one;
- there is no reputation requirements for offering a non-aggression pact. This means that you can have a very bad reputation (say -129) and still be able to offer a non-aggression pact.
Truce
Truce is required only when you want to end war. There are several things you should know about this type of diplomatic move:
- truce is the only way to end war and it cannot be used in any other circumstances apart from that;
- truce cannot be broken manually, it will last for one week and then will end automatically. The only way to end a truce before one week period is to override it with some sort of friendly political agreement (offer an alliance or a non-aggression pact etc.);
- if you have a truce with another player, you will not be able to engage in any sort of aggressive activities against that player;
- player cannot attack forts and cities of another player, who he has a truce with;
- it doesn't cost you anything (0 reputation) to offer a truce;
- there is no reputation requirements for offering a truce. This means that you can have a very bad reputation (say -229) and still be able to offer a truce.
Krieg
This political pact starts a war between you and another player. War implies several restrictions, each player should know about:
- with War pact on, you are allowed to use siege weapons (rams, ballistae, catapults and trebuchets) not only against your foe's gates and walls, but also against all of his buildings excluding the Castle';
- war allows you to capture your enemies’ cities even if they are not grayed out on the Valley map (are active);
- it costs you 50 reputation to start a war, and none reputation to end it (offer a truce);
- there is a reputation requirement for declaring a war — you should have not less than -199 reputation;
- there is a reputation requirement for accepting a war — you should have not less than -199 reputation;
Vasallentum
Vassalage is a mutually beneficial pact between two players, where one of the player acts as a lord or a sovereign and another one as his loyal vassal. The pact implies several features one should know about this political agreement:
- members of the vassal agreement are allowed to aid one another's locations;
- you can use all of your lord's or vassal's locations as rally points for you armies in-between the upcoming campaigns (you are able to visit these locations with your troops and send campaigns from there);
- a vassal automatically receives a non-aggression pacts with all of his sovereign's allies;
- a vassal automatically becomes an ally of his lord's other vassals;
- a vassal automatically becomes an enemy of his sovereign's enemies;
- it doesn't cost you anything (0 reputation) to become a lord or a vassal;
- it costs you 10 reputation to break a vassal agreement;
- there is a reputation requirement for offering someone to become your lord or vassal — you should have not less than -149 reputation;
- there is a reputation requirement for accepting someone's offer to become his lord or vassal — you should have not less than -149 reputation;
Orden
Order is a military political organization that pulls together different feudal lords and knights under the banner of a single visionary leader and aims to reach some greater goal. There are several things one should know about this political unit:
- the policy of an order is solely decided by its magistrate (master);
- members of an order are allowed to send their troops to any cities, forts, locations belonging to other members of same order;
- all the members of the order are counted as allies;
- during his initiation, new member of the order receives all the political relationships of the order's master. These new political relationships override the previous ones (also known as the personal relationships) and are counted as "active". If later, the new member leaves the order, his personal relationships with other players are restored;
- Master of the order might ask you to share something (gold, mercenary points, resources) with him, before he accepts you into the brotherhood;
- there is no reputation cost (0 reputation) for joining the order;
- there is no reputation cost (0 reputation) upon leaving the order;
- there is no reputation requirements for joining or leaving an order.
Welche Steuern und Gebühren gibt es beim Vertragsabschluss?
In 1100AD it is possible to ask for tribute or pay one, while playing with the political features of the game.
Upon signing all of the agreements, except declaring war, engaging in vassal relationship or joining the order it is possible to demand or offer a tax of 1-100 gold or 1-50 000 basic resources of each type. This payment is considered to be valid only for one occasion and will be completed only in case the selected player has the needed amount of resources. If he doesn't — he will still sign the agreement, but the tribute will not be paid.
There are special types of payments for vassal and order relationships (they are presented below). What's true for the vassal-sovereign relationship is also true for member-magistrate relationship, so the written below will only mention the vassal-lord relationship situations.
Söldnerpunkte
This tax works as follows:
- lord takes away from his vassal some mercenary point amount which is mentioned in the agreement even if they are used by his vassal right now;
- if the agreement is broken, than the vassal receives his mercenary points back;
- if the vassal has less mercenary points than there is mentioned in the agreement, then his sovereign takes all of the vassal's mercenary points he has at the moment and they are subtracted from the sum mentioned in the agreement. Then, when the vassal acquires new mercenary points, they go to his lord too, until his debt is fully paid. When the tribute is finally paid, vassal newly obtained mercenary points will go to him and he will be able to use them.
Bibliothekssteuer(percent per each donation)
This tax works as follows:
- each time a vassal donates some amount of resources to his library his lord receives a percentage of these resources (defined in the vassal agreement) to his library. This means that if the tax was set to 25% and his vassal donates a sum of 10 000 resources of each type to his library, than only 7500 of each resource will be successfully donated and the rest 2500 will be sent to his lord's library.
Bibliothekssteuer (pro Zeiteinheit)
Diese Steuer läuft wie folgt ab:
- Ab und zu (alle 1, 2, 3, 7, 10, 15 oder 30 Tage) wird die beim Vertragsabschluss festgelegte Menge an Rohstoffen (zwischen 1 und 5000) vom Lagerhaus des Vasallen in die Bibliothek des Lehnsherrn übertragen;
- wenn der Vasalle zu diesem Zeitpunkt nicht genügend Rohstoffe im Lagerhaus hat, werden an diesem Tag keine Rohstoffe übertragen.
Vertragsabschlussgebühr (Gold)
Dies ist keine Steuer, sondern eine Vertragsabschlussgebühr. Die vereinbarte Summe an Gold wird von der Person genommen, die eingeladen wird, Mitglied eines Ordens oder Vasalle zu werden. Dies geschieht nur einmal — zum Zeitpunkt des Vertragsabschlusses. Die minimale Menge an Gold ist 1, die maximale - 1000;
Steuer (pro Zeiteinheit)
- Ab und zu (alle 1, 2, 3, 7, 10, 15 oder 30 Tage) wird die beim Vertragsabschluss festgelegte Summe an Gold (zwischen 1 und 100) vom Vasallen zum Lehnsherrn übertragen;
- wenn der Vasalle zu diesem Zeitpunkt nicht genügend Gold auf seinem Konto hat, wird an diesem Tag keine Goldsteuer übertragen.
